All Hail Rallos Zek!
Stage 1: All Hail the Cleansing:
Before you Go: Grab a fishing pole and plenty of bait. Also, check your Orcish language skill and if you have none, you may want to have a friend skill you up before starting the quest as it will help you with some of the dialogues needed.
To Get this Task: Hail Crusader Vraket in Eastern Wastes and say "All hail rallos zek!"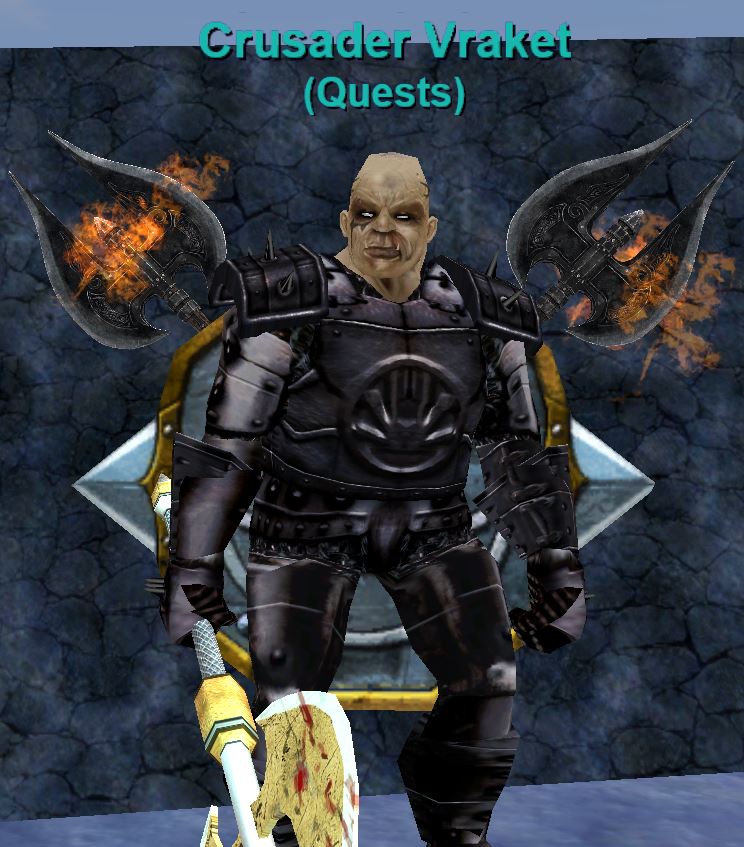
What Now?: Now its time to kill an assortment of undead creatures in Eastern Wastes and then a handful of giants. When you've finished this task, you will visit the Crusader again, and you will need to acquire some supplies and fish. You can get the update for the materials (but NOT the fish) by trading them amongst yourselves. After you acquire your fish and you are on the step to fashion the earring, head to PoK or the tradeskill area of your choice.
You will need to make:
6 Velium Infused Fish Scale Swatch
After that, combine the 6 swatches, 2 Enchanted Refined Velium, Velium Infused Logs, and a Round Cut tool to make your earring.
Note: If you are doing this with a group, you get most of the ingredients back even on success, so its best to have one person do the combine then hand off to the 2nd person, and so forth. You will do more with less in this way.
Go back to the Crusader and turn it in, and you will recieve it back, and now its time to get to work.
To finish Step 1, you must kill to evolve the item to its next variation. For me, that took approximately 420 dark blue mobs with 4 group members and 2 mercenaries. Your mileage may vary.
After you have finished evolving you head back to Crusader Vraket again, and say all hail rallos zek once more.
Go through his dialogue, and you will receive the next quest, "Orcs on Ice".
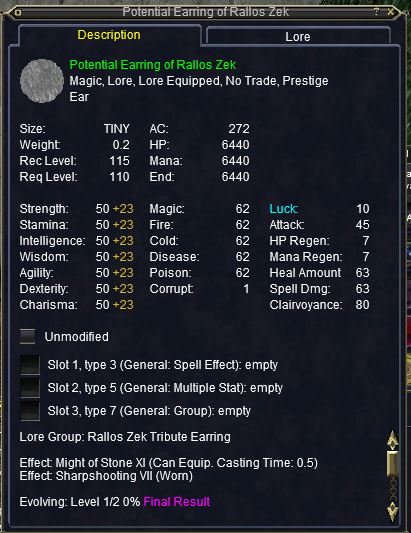
You should have a Blooded Potential Earring of Rallos Zek at this point.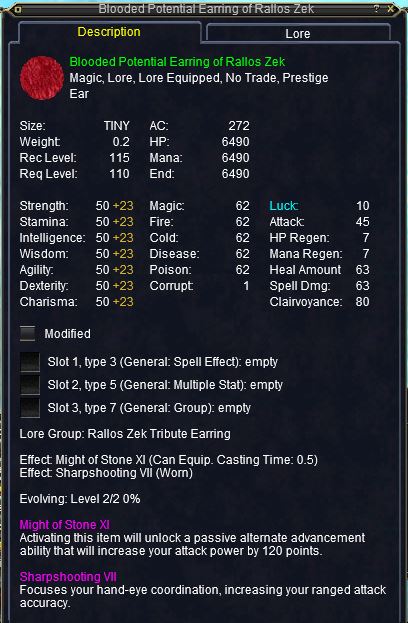
Stage 2: Orcs on Ice:
If you are lucky, you will already have the materials for the first combine for this step. Again, you can trade these to get the update but it should just autoupdate them if you have them in your inventory already - mine did.
Once you have gathered your supplies, you will fashion a Simple Velium Rod which the combine is: Pliers + 1 Raw Velium Ore in a forge.
Once you have made the ore, you will be prompted to create a Rygorr Parley Totem, which the combine is: Hickory Handled Shears, Velium Infused Pelt, Intact Restless Dead Orc Skull, Intact Restless Dead Orc Spine, and Simple Velium Rod in a loom.
Before you Go to Rygorr Mines: Grab 2 stacks of iron rations. ( you only need 10 but, take extra just in case - if you hand to the wrong mob it will take it but not update). Optional: Stick a mixing bowl, a couple of vials of purified mana, and a stack of jars of acid in your bags if, unlike me, you have plenty of room to do so ;)
What Now?: Now its time to head to Rygorr Mines. When you zone in, equip the Parley Totem you just created and say "status" to the NON-MINER orcs near the zone in from Eastern Wastes, then go through their dialogue to update the quest 4 times. Then, you will be prompted to Kill some creatures, gather some ore and feed orcs the iron rations. (NOTE: If you spent alot of time hunting here and have bottomed out your faction you may find that creating AND equipping TWO totems will push you far enough up factionwise to do the quest as that worked for a guildmate.)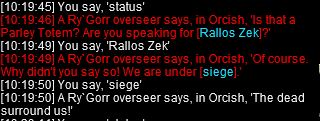
This is just one example of a conversation - there are many different variations. When my husband did this quest, he ran into all kinds of trouble with the dialogues not opening and not getting the prompts - if this happens to you, try saying "rallos zek" "siege" or "ice". We were eventually able to brute force them into updating.
For the kills, its pretty straightforward, 15 restless mobs of any type.
For the ore, you can once again trade these around to receive credit.
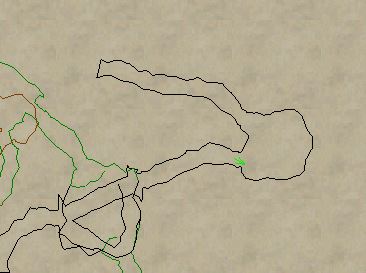
For the feeding, its a little tricky - you have to find the "trapped" live orcs that are surrounded by the undead orcs. You can only feed each "position" once - even if you kill that particular spawn point orc, you won't be able to feed its new spawn orc. You will have to use each of the orcs in the area below on the map so keep track of which one you've fed.
I found that this section of the map worked, after a hint from Firiona.Vago:
In Good's Maps it will be BLACK as indicated below. On Brewall's maps, it will be BLUE.
After those three steps are complete, its back to the Crusader again!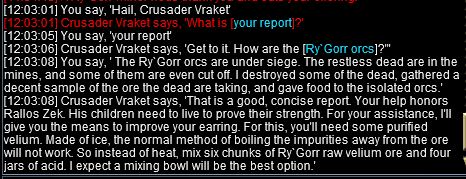
And.... back to Plane of Knowledge we go! (unless you have those optional jars of acid and a mixing bowl on you....)
He tells you what you need to do, but, in a mixing bowl, you will want to make Purified Velium.
To do so, you combine 6 Rygorr Raw Velium Ore and 4 jars of acid (storebought from pottery vendor) in a mixing bowl.
and back to Crusader we go! Hand in your newly created Purified Velium, and you will be instructed to create the next earring in the chain.
Its also worth noting when its time to do these combines, you learn the recipe as part of receiving the quest - so you don't have to experiment - so when you head back to craft the earring ( or use your JC bag ), just search for rallos to see the available recipes for the earrings.
The combine for the Forceful Earring is: Blooded Potential Earring of Rallos Zek + Purified Velium + Vial of Purified Mana in a JC bag/table.
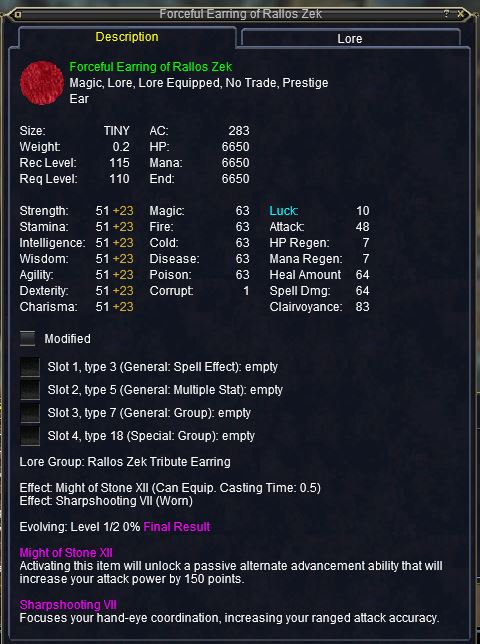
When you do the combine successfully, the quest "Orcs on Ice" completes and you receive Forceful Earring of Rallos Zek. At this point, it is time to mindlessly slaughter and evolve your earring again. Good luck!
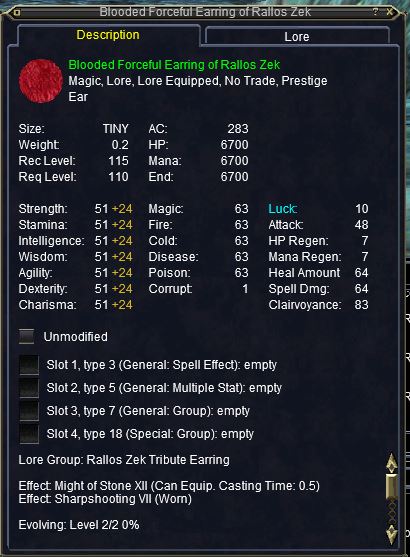
After your slaughterfest, your earring will automatically evolve to: Blooded Forceful Earring of Rallos Zek. BE SURE TO REMOVE YOUR AUGMENTS BEFORE EVOLUTION OCCURS - I know that may be a case of me being a better safe then sorry girl, but i've heard from others who have lost this particular gamble.
After you have finished evolving you head back to Crusader Vraket again, and say all hail rallos zek once more.
Go through his dialogue, and you will receive the next quest, "The Foundation".
If you do not have all of your Mercenary tasks done, you will not be able to receive the next quest until that is complete.
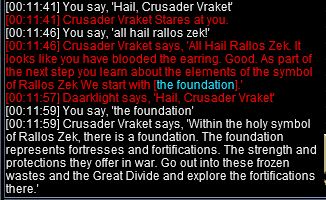
Stage 3: The Foundation:
When you receive the quest "The Foundation", the first several steps are location updates, or exploration tasks.
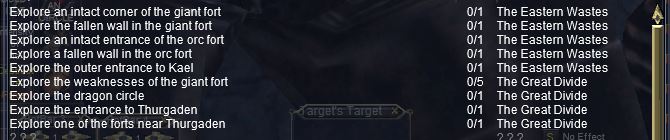
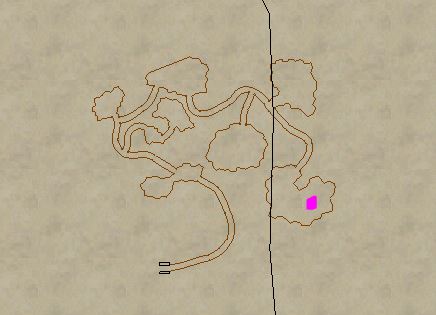
First, we are off to the Giant Fort in Eastern Wastes.
You can find the intact corner and fallen walls at these locations.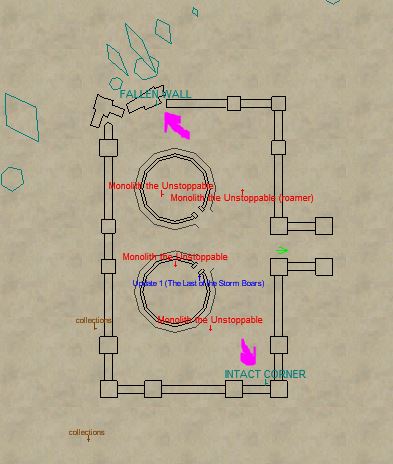
Then, we are off to the Orc Fort!
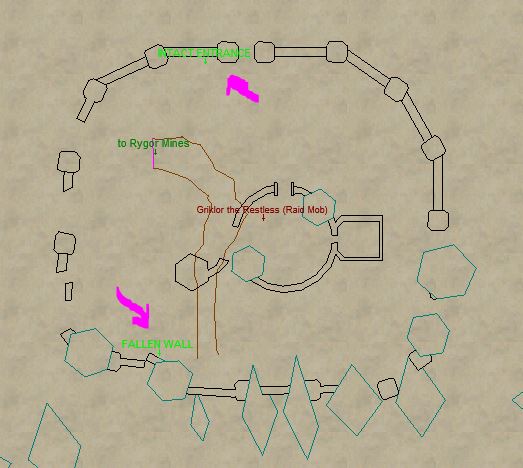
Mount up and its off to the Kael entrance....!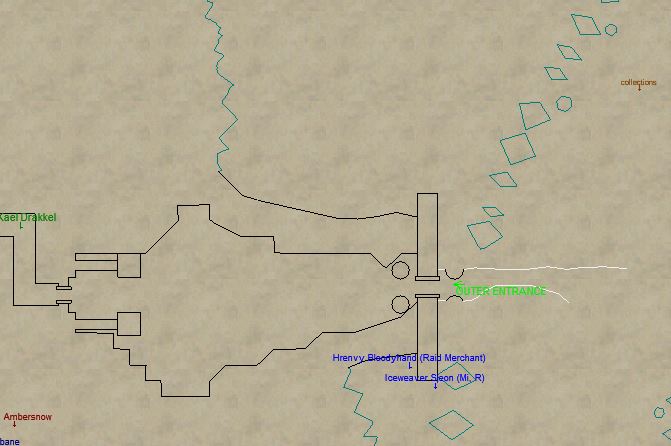
Hold on to your hat and its off to Great Divide.... First stop, the Giant Fort:
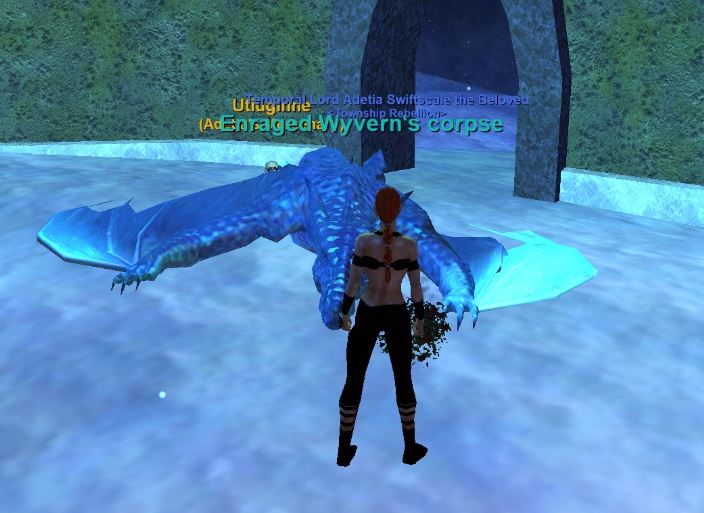
Let's visit the Dragon Circle!
WARNING: Be READY for a fight. When you arrive at the druid circle, there will be an Enraged Wyvern (yellow con at 115) waiting for you. When you kill it, you will get the update for this location. I molo'd it, as you can see here, but this could go badly for you if you aren't prepared for it. Bring a friend if you need to! Be aware that some folks from other places have reported that this mob doesn't necessarily autoaggro everyone like it did me. But it should be there, look around! Also - if you have more then one person in the group at this stage, it may(should) update everyone at once.
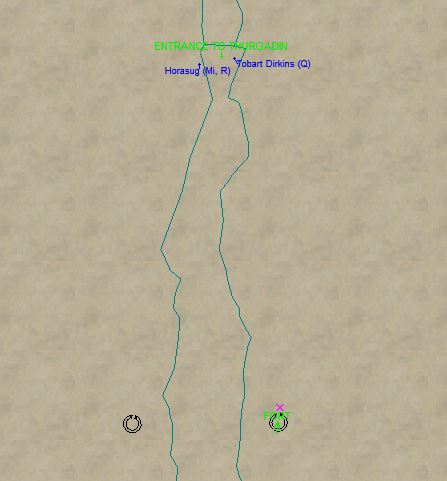
And off to explore Thurgadin... and a nearby fort!
Its now time to go back to Crusader Vraket and report to him our findings. Hail him, then go through his dialogue:
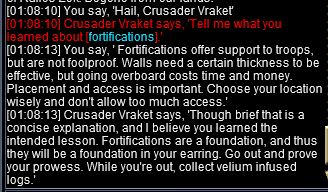
After your discussion, he sends you on errands as follows:
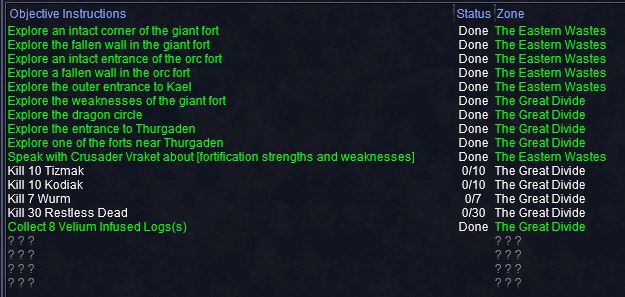
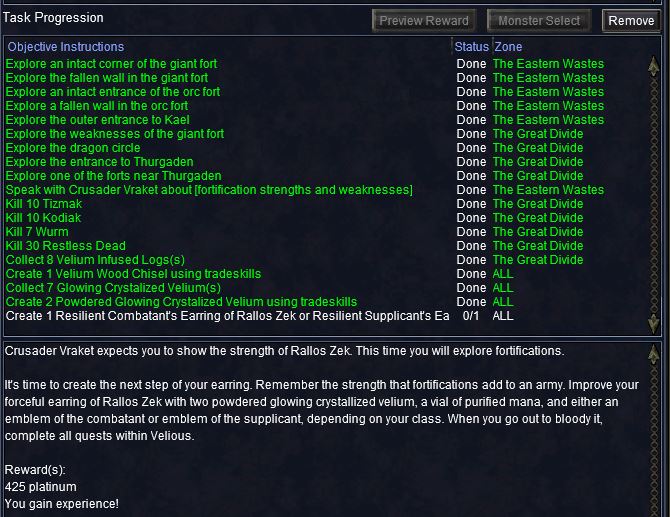
As with many of the other previous steps you can update the logs stage by trading them to a npc and hitting cancel. And then, its time for more adventuring! For me, I found it easiest to roam down the wurm cave tunnel straight south, then kill kodiaks and dwarves, then once kodiaks were done, head NW for tizmaks. Once you complete the 10 tizmak portion, they will also count for restless dead. Once all 4 of these stages complete, you will be instructed to create a velium chisel.
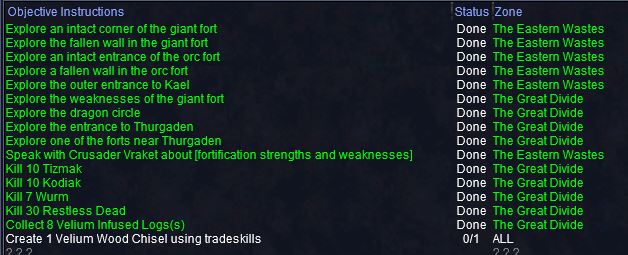
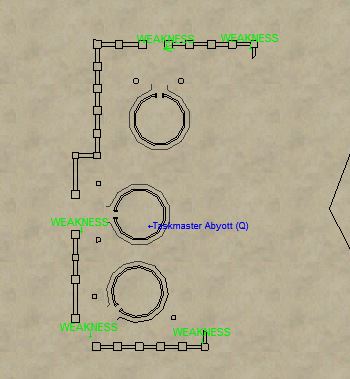
You'll need to head to Frostone in Crystal Caverns and buy a Chisel Set from Sandrice. While you are there, go ahead and pick up 1 emblem of the combatant or supplicant depending on your class for future usage in another stage. Then in a fletching table, combine 8 Velium Infused Planks + Chisel Set + Gnomish Heat Source. Once you have completed that and have your newly fashioned Velium Wood Chisel, its off to Great Divide to the dwarven mines to collect velium. Be sure to follow the directions of this quest specifically and carefully so that you don't have to start over.
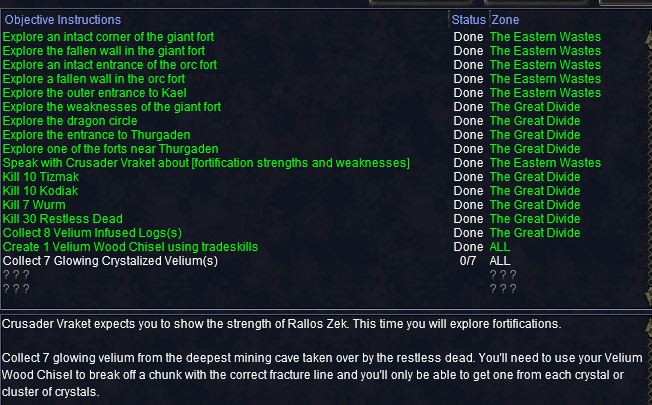
This part can be tricky - this is the type of place that one irritating little dorf can become 5 irritating little dorfs, so take a friend if you are squishy. If you are lucky, someone will already be in the cave killing - if that's the case you can do it solo, carefully not to train your new friends. Go deep into the caves in GD, pictured here, all the way to the last room.
Once you arrive and clear some dwarves, equip your Velium Chisel, and walk over the crystal - you can do this part IVU also.

If you get the first message - then you need to clear something standing too close. With a successful update, you will see the second message and get a Glowing Crystallized Velium on your cursor. You will need to do this seven times before leaving the caves. (Note: You can succor, zone, or log out and back in to get an update from the same crystal if you are only to keep one clear.)
Now its time to do some more tradeskilling.
You will want to be VERY CAREFUL to do this next stage properly, use your trophies, and exercise caution here - one misstep or failure and you will have to restart this quest to get more velium.
Step 1: In a forge, combine: 7 Glowing Crystallized Velium + Velium Smithy Hammer + Superb Leather Padding which will give you FOUR Crushed Glowing Crystallized Velium.
Step 2: 4 Crushed Glowing Crystallized Velium + Superb Leather Padding + Velium Smithy Hammer which will give you TWO Powdered Glowing Crystallized Velium. (NOTE: I did not do it this way so cannot guarantee the accuracy of this, I am told that since I did this myself, the quest has been changed, and you can only do it this way now, and that's how my husband did the quest and it worked just fine.)
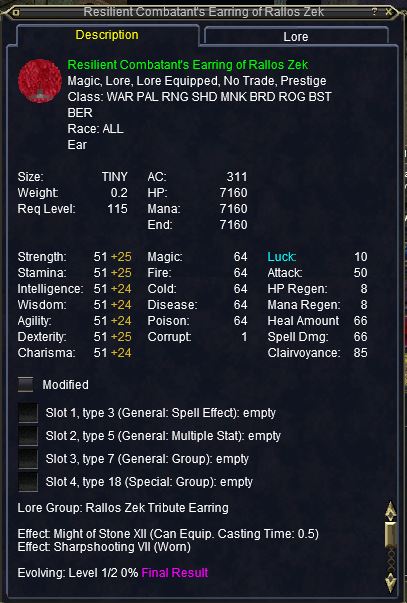
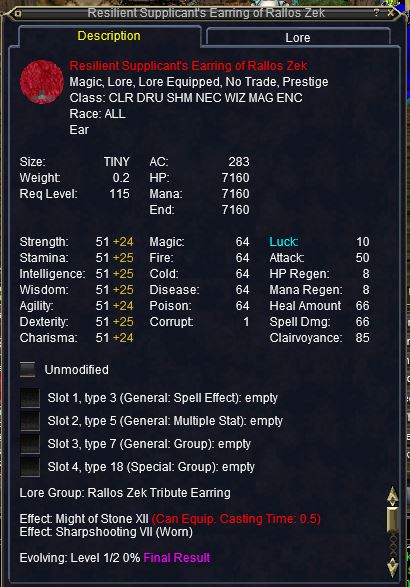
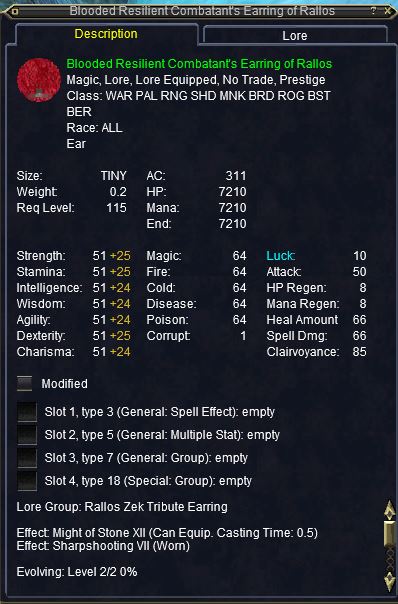
Since I am a MONK, I am creating the Resilient Combatant's Earring - you can search for resil in the JC TABLE and you don't have to experiment. Make sure to remove any augments in your earring first.
When you are finished with this stage, you should have one of two earrings here to proceed:
At this point, "The Foundation" quest is completed and goes away, and it is time to mindlessly slaughter and evolve your earring again. After your slaughterfest, your earring will automatically evolve to: Blooded Resilient Combatant's (or Supplicants) Earring of Rallos Zek. BE SURE TO REMOVE YOUR AUGMENTS BEFORE EVOLUTION OCCURS - again - better safe then sorry!
After you have finished evolving you head back to Crusader Vraket again, and say all hail rallos zek once more.
Go through his dialogue, and you will receive the next quest, "The Morale of Despair".
If you do not have all of your Partisan tasks done, you will not be able to receive the next quest until that is complete.
Stage 4: The Morale of Despair
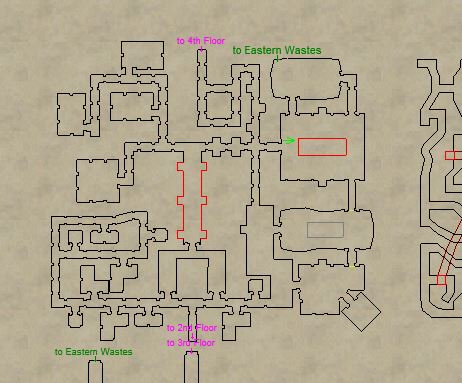
This stage is all about the Tower of Frozen Shadow.
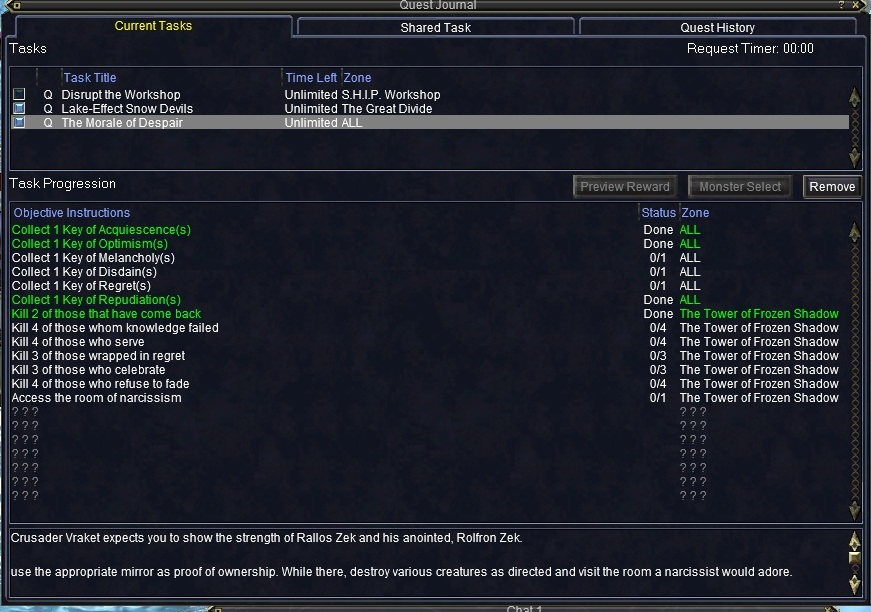
As you can see the set of ToFS keys is required - however if you have them already, this stage autoupdates as you can see above.
If for some reason it does not auto update try the following:
1. Verify that you have your keys on you, pull them back out of the bank if needed.
2. Travel to the "mirror room" with your spare key.
3. Hand your keys to your mercenary, then click cancel.
4. Log to desktop and come back and try all of the above again.
(This ususally works to shake it loose.)
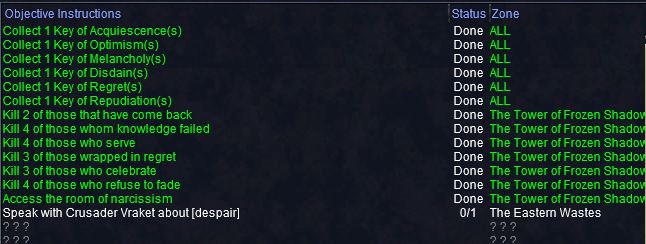
For the kill stages, you will need to be in various locations to accomplish these kills:
Kill 2 of those that have come back: This updates on Floor 1, with the white flesh tone "a returned shadowbeast".
Kill 4 of those whom knowledge failed: This updates on Floor 2, with students or scholars.
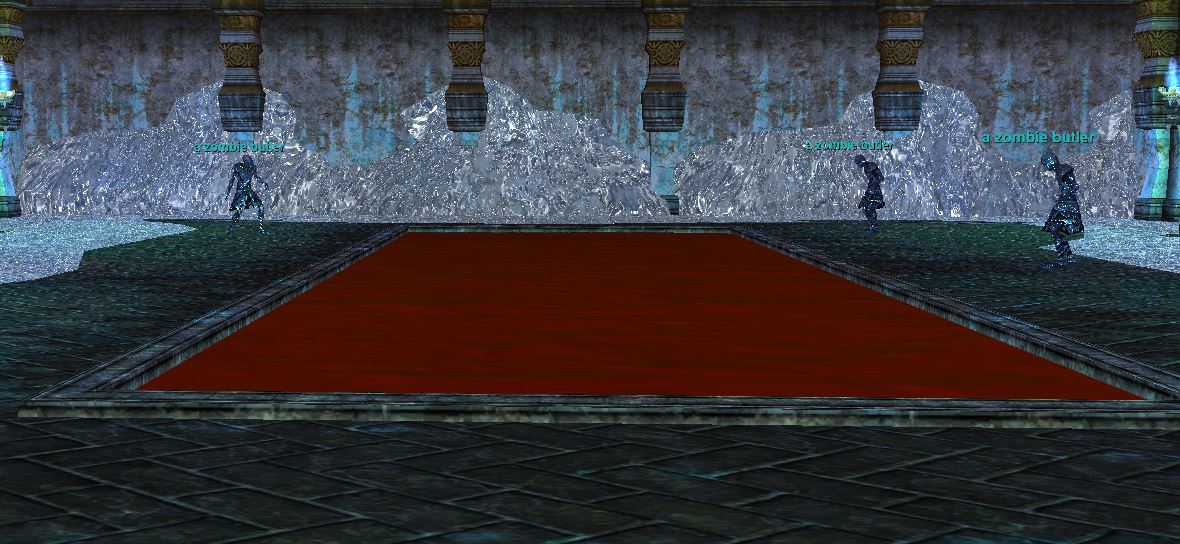
Kill 4 of those who serve: This updates on Floor 3, with maids, butlers, etc.
NOTE: While you are here, kill a few armors and get restless padding if you don't have a few already.
Kill 3 of those wrapped in regret: This updates on Floor 4, with mummies.
Kill 3 of those who celebrate: This updates on Floor 5, with dancers.
Kill 4 of those who refuse to fade: This updates on Floor 6, with shades.
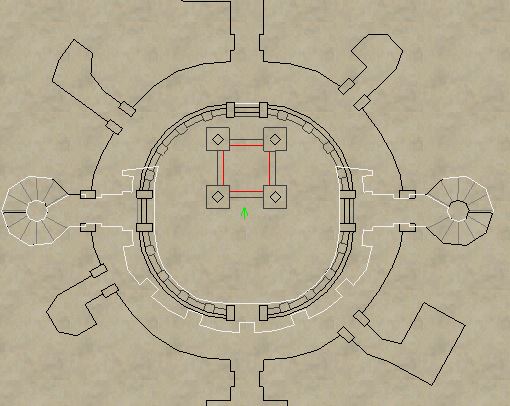
From there, you must access the room of narcissism: If you have a spare key, head up to the mirror room, and it should update there.
Now it's time to head back to see our friend Crusader Vraket!
Once we've spoken to Crusader Vraket, the next portion of the quest opens up like so: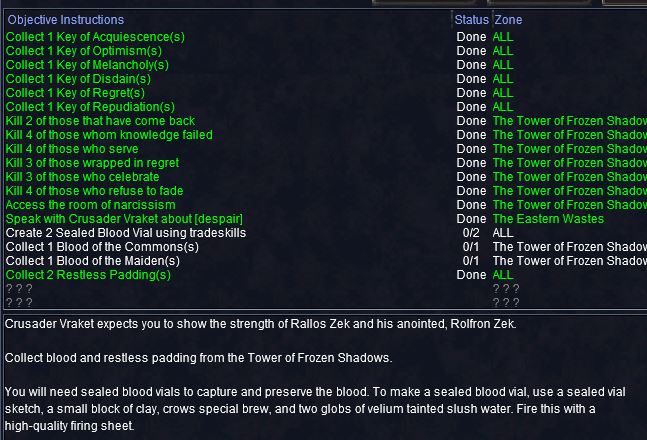
Once again, if you have the restless paddings as I suggested above, you can trade them around to get it to update.

It is at this moment in time we bring you your first scheduled INTERMISSION from the tradeskill quest. By completing this much of the task, you have now earned your first bonus recipes as a reward for your toils and trouble.
You have learned the recipe Tenacious Combatant's Earring of Rallos Zek!
You have learned the recipe Enchanted Velium Clay!
You have learned the recipe Unfired Velium Empowered Gem Crucible!
You have learned the recipe Velium Empowered Gem of Freezing!
(Edit from adetia: my instructions here were previously backwards, updated to be correct info January 9th, 2021)
If you are already wearing a Velium Infused Gem of Security, you will want to power it up by making a clay and then a crucible to create a Gem of Freezing. The Gem of Freezing can then be converted into the following forms, the one you will want will vary by what class you are:
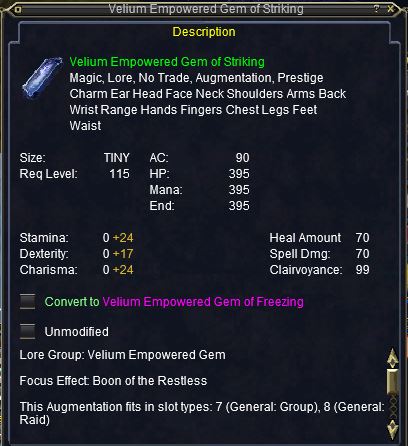
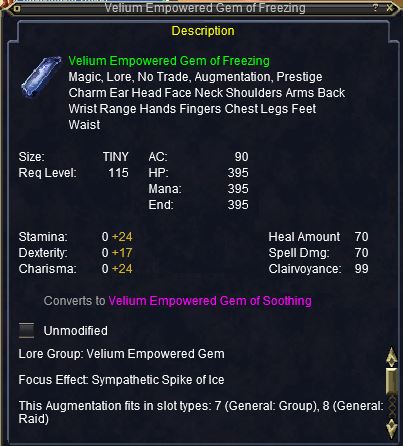
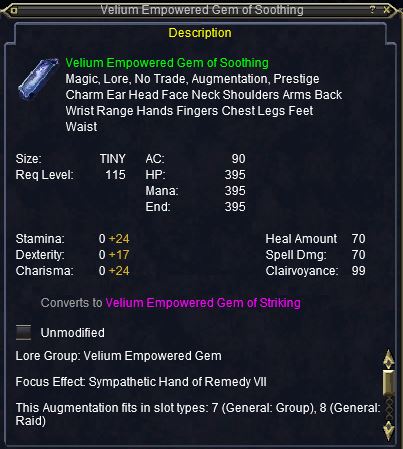
After you have converted your existing Velium Infused Gem of Security to its empowered form, you will want to craft a NEW ONE to replace it in your active augmentation set (you can and probably should still be wearing both).

And now... back to our earring quest!
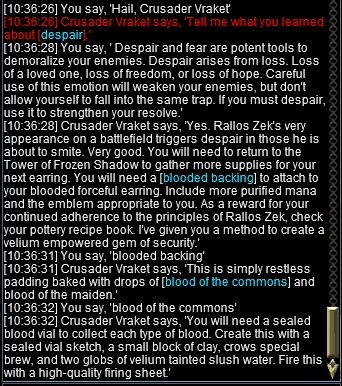
First, you must craft 2 Unfired Sealed Blood Vial and then fire them with a high quality firing sheet to make Sealed Blood Vial.
Once you have your 2 sealed vials, head back to Tower of Frozen Shadow.
For me, I used Tserrina's Spare Key to go to floor 3, then IVU and walked into the blood pool and got the update completely safely by myself.
I then went out the nearby exit to Eastern Wastes, came back in, and used the spare key to go back to Floor 5 to visit the blood pool there.
Now its time to head back to do some crafting.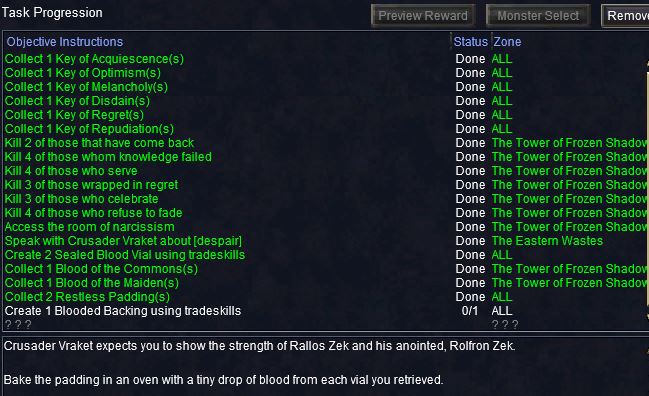
To make the Blooded Backing, combine the two bloods you received from the above step + 2 restless paddings in an oven.
Then, we are instructed to make the next earring:
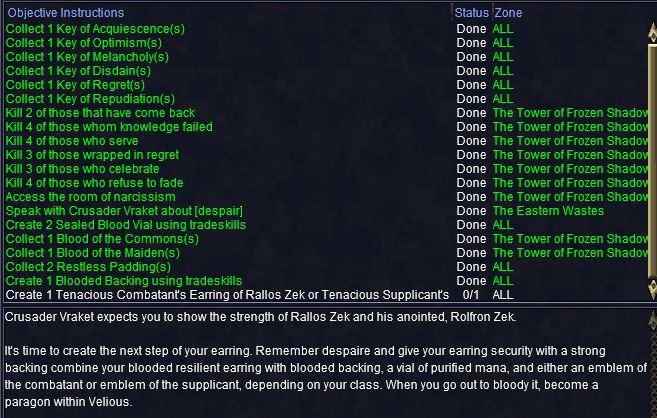
BEFORE YOU CRAFT YOUR EARRING, REMOVE ANY AUGMENTS THAT ARE IN IT.
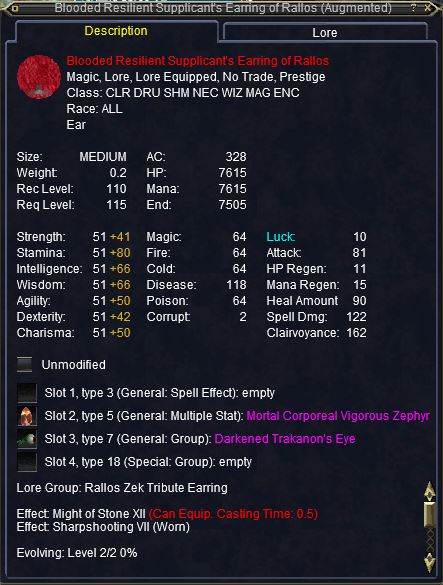
To craft the Earring, you will need your blooded resilient earring + a vial of purified mana + the proper emblem for your class, which are available in Frostone from Sandrice Gemheart. As you can see, to fully evolve this earring you will need to complete Paragon of Torment of Velious.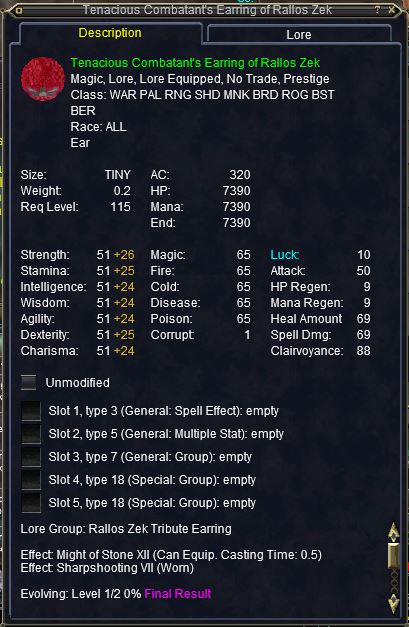
At this point, "The Morale of Despair" quest is completed and goes away, and it is time to mindlessly slaughter and evolve your earring again. If you don't have Paragon of the Torment of Velious done, get to work! After your slaughterfest, if you meet the other requirements, your earring will automatically evolve to: Blooded Tenacious Combatant's (or Supplicants) Earring of Rallos Zek. BE SURE TO REMOVE YOUR AUGMENTS BEFORE EVOLUTION OCCURS - again - better safe then sorry!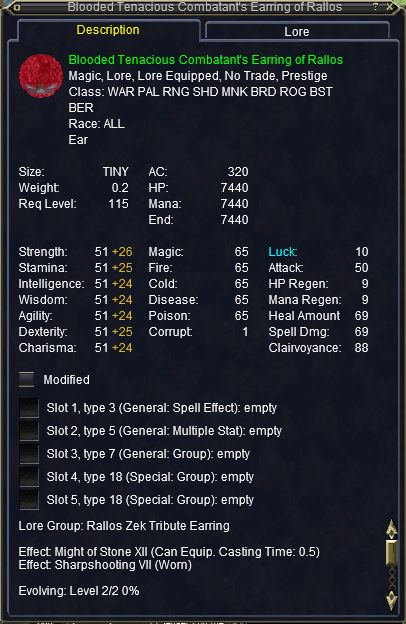
After you have finished evolving you head back to Crusader Vraket again, and say all hail rallos zek once more.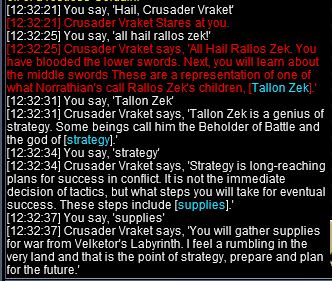
Go through his dialogue, and you will receive the next quest, "Strategic Supplies".
Stage 5: Strategic Supplies
This stage is all about adventuring in Velketor's Lab.
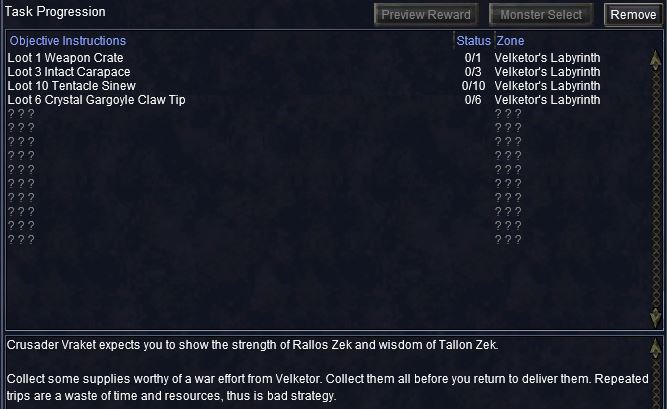
We start with a scavenger hunt:
Loot 1 Weapon Crate (kill kobolds)
Loot 3 Intact Carapace (kill spiders)
Loot 10 Tentacle Sinew (kill tentacle mobs)
Loot 6 Crystal Gargoyle Claw Tip (kill gargoyles)
and then it is back to our friend, Crusader Vraket to deliver them and then run through his dialogue:
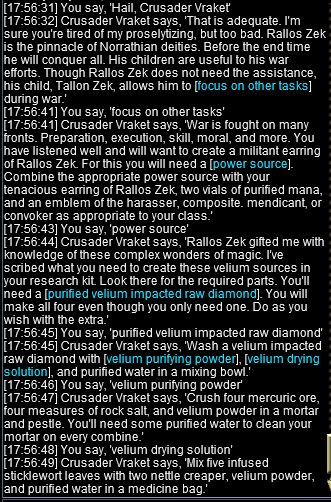
From here, we reach our next crafting stage.
In case you missed it, as part of the dialogue above, you also received 4 new recipes:
Now unlike the Freezing Gem intermission we took above, you have to actually craft one of each of these, and then the earring to advance your quest. Make friends or load up your poisoncrafter, alchemist and tinkerer! 
Velium Protector Source
Velium Mendicant Source
Velium Convoker Source
Velium Assaulter Source
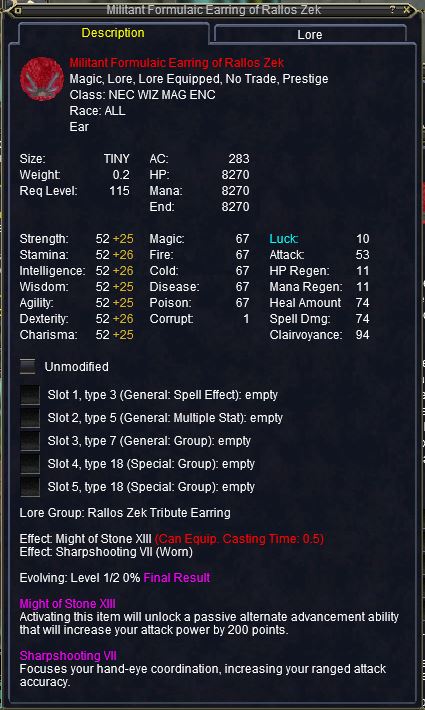
Then its time to REMOVE ANY AUGMENTS from our earring and then create our next earring... search for militant in the JC table!
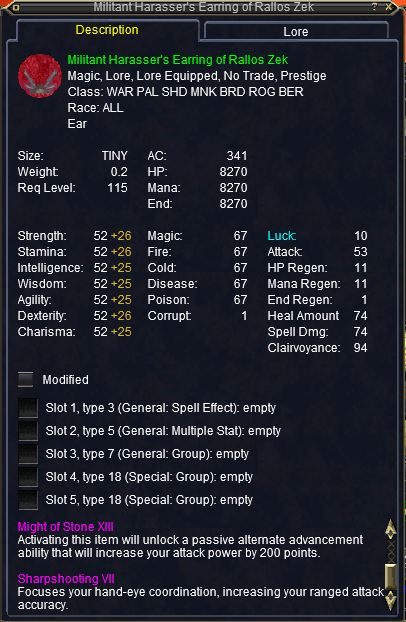
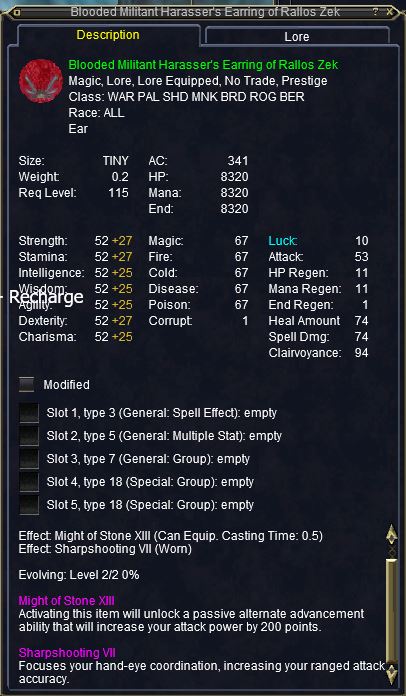
At this point, the "Strategic Supplies" quest is completed and goes away, and it is time to mindlessly slaughter and evolve your earring again. After your slaughterfest, your earring will automatically evolve to: Blooded Militant Harasser's (or Supplicants) Earring of Rallos Zek. BE SURE TO REMOVE YOUR AUGMENTS BEFORE EVOLUTION OCCURS - again - better safe then sorry!
p.s. if you do not have your Master Scavenger achievement done, this is the perfect time to grind that out while you work on evolve xp.
After you have finished evolving you head back to Crusader Vraket again, and say all hail rallos zek once more.
If you do not have the Torment of Velious Master Scavenger complete at this checkpoint, you will not be able to progress further until you do.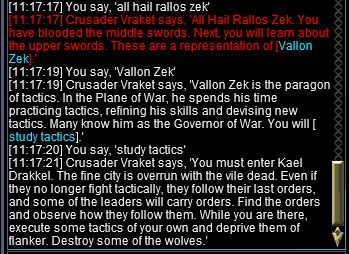
Go through his dialogue, and you will receive the next quest, "Tactical Observations".
Stage 6: Tactical Observations
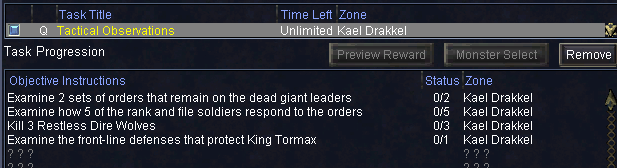
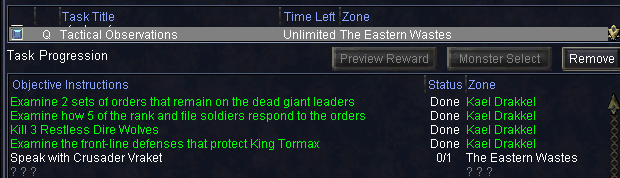
To begin, we get several stages of the quest at once:
- Examine 2 sets of orders that remain on the dead giant leaders
- Examine how 5 of the rank and file soldiers respond to the orders
- Kill 3 Restless Dire Wolves
- Examine the front-line defenses that project King Tormax
I started by going here, the giants in the near vicinity completed Stage 2.
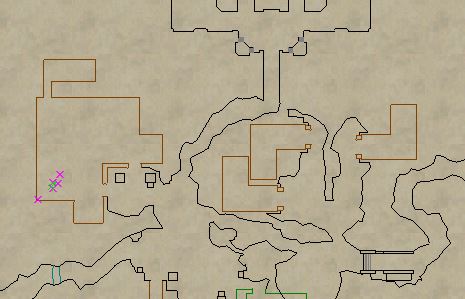
From there, I went south in the zone, and finished Stage 1 and 3. 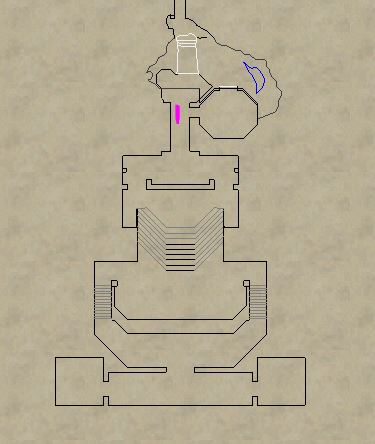
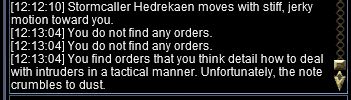
Its worth noting that the orders on Stage 1 are virtual updates and each giant's messaging will go in SAY for each person that is on the quest - it will randomly update one person at a time as you can see below.
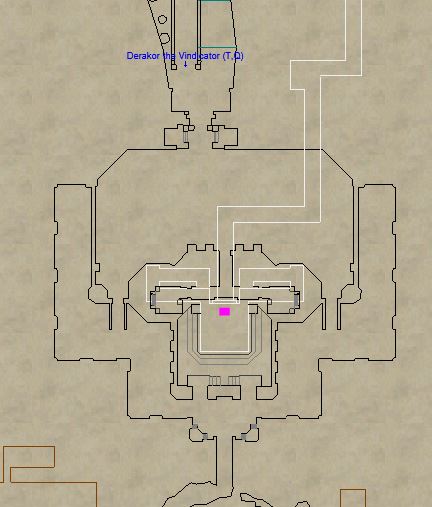
Stage 4 is a simple location auto-update near Derakor the Vindicator.
From there, you return to Crusader Vraket to update your quest, which will open several more stages.
- Kill 20 Restless Dead
- Collect 6 Restless Bone Marrow
- Collect 5 Restless Giant Skull
- Lay five skulls of the abominations at the head of the honored head
- Destroy a dead giant before the statue of Rallos Zek
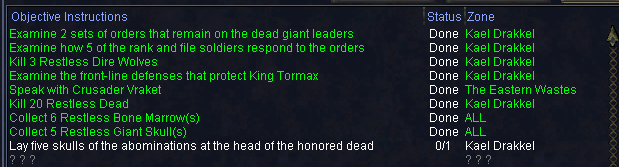
Once again, we can use the hand to mercenary and cancel trick to update the collect stages if you already have these pieces in your bags.
From there, we used the same location in the south to get our 20 kills in:
Once the kills were done, we went to the southeast room to the burning corpse to get the "Lay five skulls" update. Be aware this will break your IVU - plan accordingly.
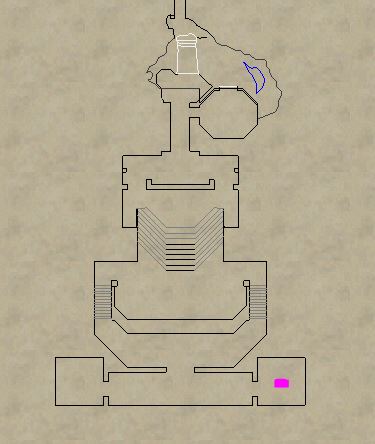
Now it is time to IVU again and travel to the Statue of Rallos Zek.
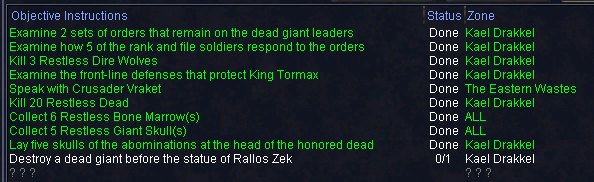
For the last stage, you'll want to pull an undead giant down to the statue and kill it right next to the statue.
For our group, the first kill updated everyone but one person in our group, and we had to kill a second for them and it updated.
Then its back to our friend Crusader Vraket, where he instructs you to do some tradeskilling as below.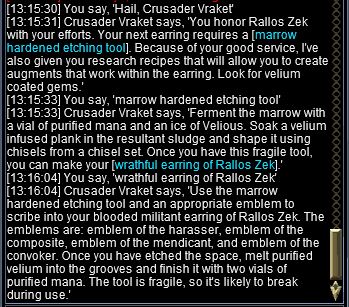
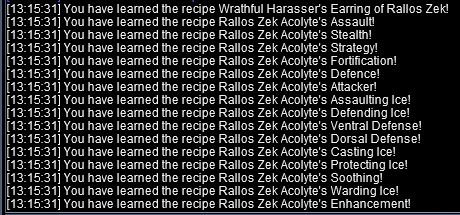
During the course of this dialogue, you also receive several recipes, to create the Type 18 augments as you can see here:
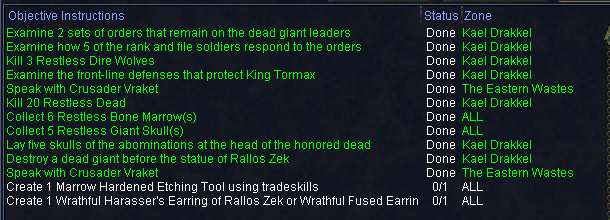
You are then charged with making Marrow Hardened Etching Tool and after that, your Wrathful (Harasser/Fused/Mystic/Formulaic) Earring of Rallos Zek. REMOVE ANY AUGMENTS from your earring prior to combining. This recipe is already learned so just search for wrathful in the jewelcrafting container of your choice.
In more detail, you will need to first create:
Fermented Restless Bone Marrow = 6 Restless Bone Marrow + 1 Ice of Velious + 1 Vial of Purified Mana in a brew barrel.
Marrow Hardened Etching Tool = 1 Fermented Restless Bone Marrow + Chisel Set + 1 Velium Infused Plank in fletching table.
Purified Velium = 6 Ry'gorr Velium Ore + 4 jars of acid in mixing bowl.
Wrathful Earring for your class = Existing earring + 1 appropriate class emblem + Marrow Hardened Etching Tool + Purified Velium + 2 Vials of Purified Mana in JC table/kit.
You may, if you have a jewelcrafting skill of less then 300, have to take a break and get your jewelcrafting trophy if you don't have it, or skill up your jewelcrafting a bit prior to this combine. The skill required to attempt the combine is somewhere above 301 and below 326. It also seems fairly "faily" with low skill, so be prepared to have to go back for more marrows. In our set of 3, I was the only one who skated through with one try - the other 2 had lower skill, and we had to get a trophy for one, and the other failed at 326. On fails, you can lose the marrow hardened etching tool which means more painful marrow camping.
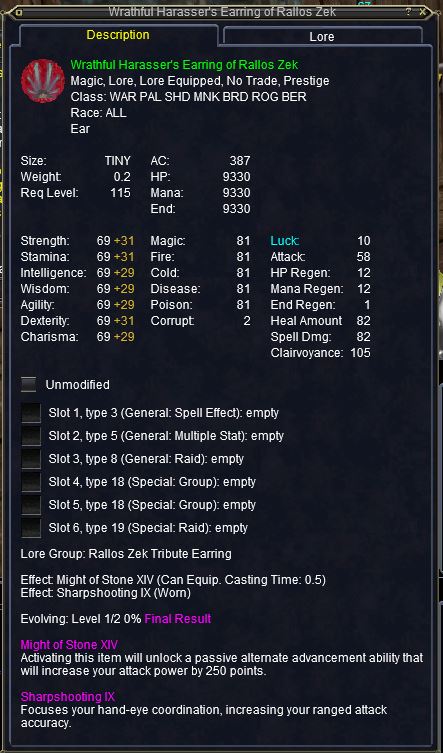

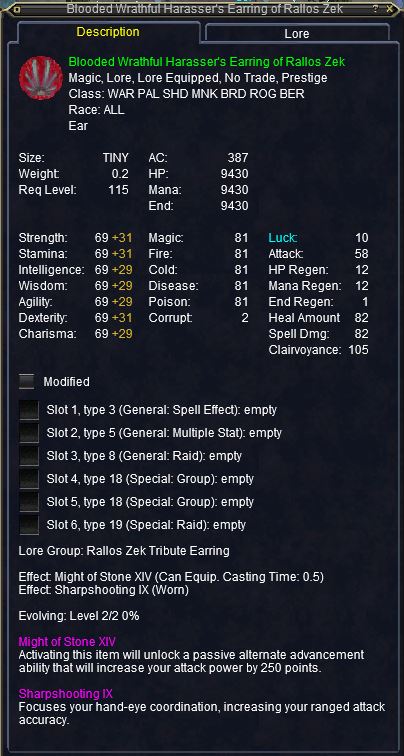
At this point, the "Tactical Observations" quest is completed and goes away, and it is time to mindlessly slaughter and evolve your earring again. After your slaughterfest, your earring will automatically evolve to: Blooded Wrathful Harasser's (etc) Earring of Rallos Zek. BE SURE TO REMOVE YOUR AUGMENTS BEFORE EVOLUTION OCCURS - again - better safe then sorry!
p.s. if you don't have Hunter done - get to work! ;)
After you have finished evolving you head back to Crusader Vraket again, and say all hail rallos zek once more.
If you do not have the Restless Slayer achievement complete at this checkpoint, you will not be able to progress further until you do.
MORE DETAILS AND BETTER FORMATTING SOON - Refresh and there may be something new here!
Feel free to contact me at luclin.adetia with questions or information